The Student Portal allows any student with access enabled to log in and view various details regarding their enrolment. In this article, we will cover the various preferences that can be set for the Student Portal and explain the functionality behind them.
TABLE OF CONTENTS
- Check if the Student Portal is Enabled
- Accessing your Self-Service Portal Settings
- Assessment Centre
- Dashboard
- Display
- Extensions
- Finance
- Permissions
- Preferences
- Miscellaneous
Check if the Student Portal is Enabled
To check if you have the Student Portal enabled, go to Help → About.

Scroll down until you see the Self-Service heading. If it says Yes next to Student then the Student Portal is activated on your site.

Note
You will need to contact ReadyTech support if you need to enable the Student Portal.
Accessing your Self-Service Portal Settings
To access your Self-Service Portal settings, go to Administration → Configuration → Preferences.

On the left-hand side of the screen, click on Self-Service Portals then the Edit button.


We will give a brief explanation of each group of settings on this page.
Assessment Centre
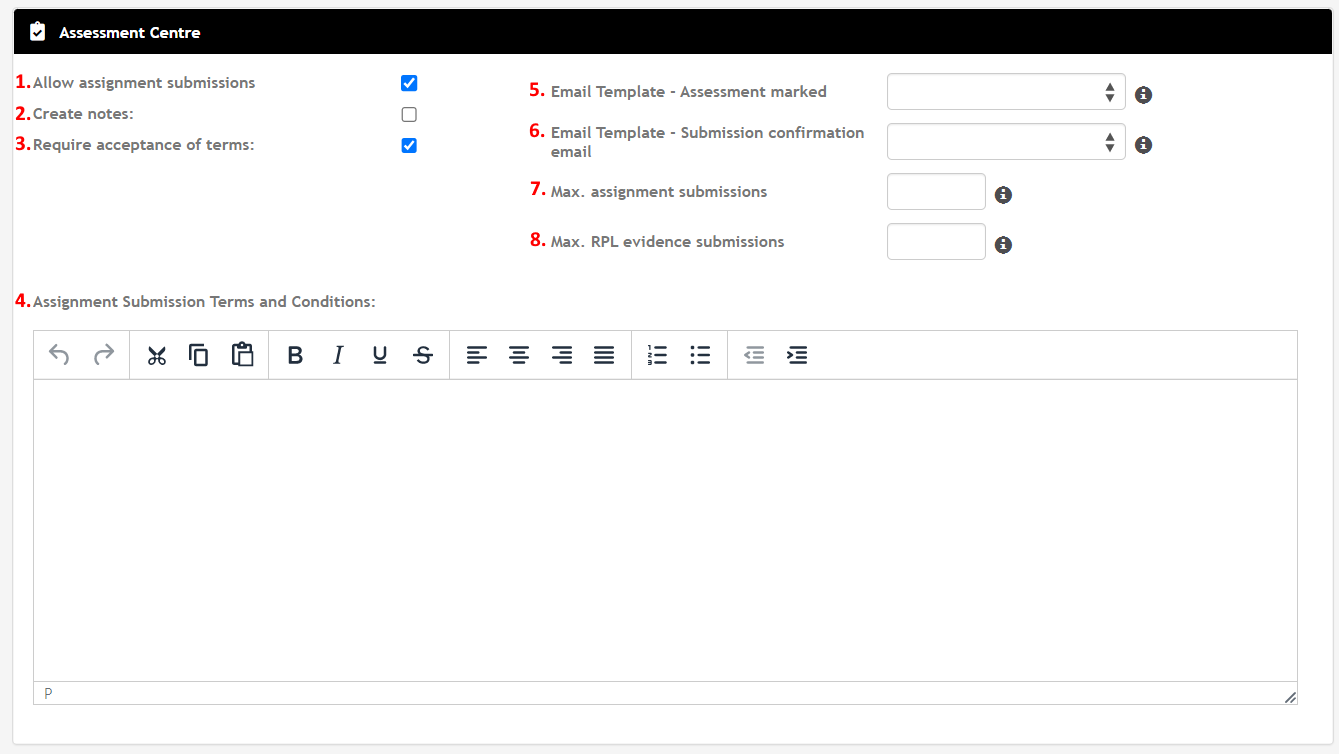
These settings are specific to the Assessment Centre, which allows students to submit assignments for their enrolments.
- Allow Assignment Submissions: This will enable the functionality for students to submit assignments via the Student Portal. The setting needs to be enabled for the other settings under the Assessment Centre heading to appear.
- Create Notes: This will create a file note against the student’s party profile whenever they submit an assignment. It will contain details on the student’s assignment submission.
- Require Acceptance of Terms: Creates a requirement for the student to accept terms and conditions before they can submit the assignment.
- Assignment Submission Terms and Conditions: Text field where you can write the terms and conditions that the student must accept before they can submit an assignment. Require Acceptance of Terms must be enabled for this to appear.
- Email Template – Assessment Marked: Sets the email template that is sent to the student when their assignment has been marked.
- Email Template – Submission Confirmation Email: Sets the email template that is sent to the student when they submit their assignment.
- Max. Assignment Submissions: This sets the maximum number of submissions that a student can upload against a single unit or subject.
- Max. RPL Evidence Submissions: This sets the maximum number of evidence submissions that a student can upload for a single enrolment.
Dashboard

Each setting under this group allows you to enable or disable specific elements of the Student Portal. If you don’t use specific features or want to prevent the student from accessing certain pages, you can do so here.
Note
It is highly recommended that you enable the New Dashboard, otherwise the checkboxes to disable certain pages will not appear and you will get the older dashboard instead.
Display

These settings will change certain elements within the pages in the Student Portal. Some are self-explanatory but others might need a more detailed explanation.
- Combine subject Elements: If there are units that contain elements under a subject, enabling this will place the elements under the subject instead of the units under the subject.
- Hide Attendee Counts: Will hide the number of attendees and open available slots for an event.
- Hide Contacts on Profile: Hides any contacts on the student’s My Profile page.
- Publish Certificates: This setting will determine if the student can view their own certificates in the Student Portal.
- None: No certificates can be viewed by the student.
- All: All certificates issued to the student can be viewed in the Student Portal.
- Portal Enabled: Only certificates that have the Portal Enabled checkbox enabled can be viewed.
Extensions

If you make use of any Services, you can allow students to make Extension requests for specific service types here.
Finance

The Finance settings mainly concerns the functionality to make payments through the Student Portal.
Note
Most settings under this heading will not appear unless the Allow Payments checkbox is checked.
- Payment Gateway: Selects the payment processor that the student will use when making payments through the Student Portal.
- Payment on Outstanding Course Invoices: Allows Payments to be made against any invoices for a course.
- Payment on Outstanding Service Invoices: Allows Payments to be made against any invoices for a Service.
- Payment on Course Applications: If the student is submitting a course application via the Student Portal, enabling this will allow them to make Payments during the application process.
Permissions

These settings can allow or disallow students from doing certain things in the Student Portal.
- Allow Updating AVETMISS Information: Enabling this will allow the student to edit any of their details that are also submitted in AVETMISS reports.
Warning
Be very careful when enabling this setting, as this could cause critical AVETMISS fields to change between reports and lead to errors when submitting.
- Allow Updating Contacts: This will allow the student to update the details for the Contacts that are attached to their party profile.
- Allow Updating of Key Personal Details: Allows the student to update their First Name, Surname and Date of Birth. This will only apply if they do not have a verified USI.
- Disable Self Service Enrolment: Controls if a student is allowed to enrol or unenroll from specific units.
- Prevent Student Notes to Academics: This will prevent any notes that involve the student from being assigned to Academics.
- Self Service Event Enrolment: Allows the student to enrol into any events that are attached to their enrolled units.
Preferences

- Use Primary Email as Login ID: This will allow the student to log into the Student Portal using the primary email address in their party profile.
- Require Acceptance of Terms for Updating Student Profile: Requires the student to agree to some terms and conditions before updating their party profile.
- Custom Message: Displays a message when the student attempts to make edits to their party profile. Check the box to make a text field appear and enter the message that you would like to display.
- Form Page Description: Allows a custom message to be shown on the forms page.
Miscellaneous

- SSO for Student Portal: If Single Sign On is enabled on your site, it will allow students to also use it to log into the Student Portal.
- Requires Acceptance of Terms & Conditions for Accepting Offer: If the student receives an Offer because of one of their course applications, it will require them to accept terms and conditions before they can accept the offer.
- Display Brand Based on Active Enrolments: This will change the logo displayed on the Student Portal based on the Brand set at the student’s enrolment. Otherwise, the default logo will be displayed.
- Custom Message: This will display a custom welcome message when the student logs into the Student Portal. Check the box to make a text field appear and enter the message that you would like to display.